Redux Info
集中狀態管理概念、狀態管理工具庫 目的是將應用程式狀態集中�化管理,解決在大型或複雜的應用中,多層組件間的狀態共享
Three Principles
-- Single Source of Truth 單一資料來源
-- State is read-only 狀態沒辦法直接修改,並須經過 Redux 規定的流程
-- Reducer should be pure 保持 state 可預測性、可回溯性,並確保不會影響原 state
Redux Core Concepts
-- Store: 狀態存放容器
-- Actions: 純 JS 物件,定義改變狀態的所有方式(type)
-- Reducer: JS 純函數 ( pure function ),定義操作、執行,返回更新後的狀態值
-- Dispatch: 發送 action,通知 reducer 執行
-- Selectors: 存取 Store 的狀態
-- Provider: Redux 提供的高階 React Component,用來連結 Redux Store 跟 React。允許 child component 可以存取 Store 的狀態。
Redux in React
在講 Redux 怎麼跟 React 合作前,提醒自己,Redux 是一個通用的概念,並非只能運作在 React 上。像是 Angular 可以用 NgRx、Vue 用 Vuex 等等,但上述所講的 Redux 的核心是相同的。
React 單向流的特性,會導致以下問題:
-- 狀態提升 ( Prop drilling ) :共享狀態的子組件,必須提升狀態至共同的父組件,導致程式耦合、狀態經過不需要的組件
-- 數據追蹤困難:層級過深、不同父組件的��跨組件共享、子組件從多個來源接收 Props
Work Flow
搭配 Core Concepts ,運作流程如下圖
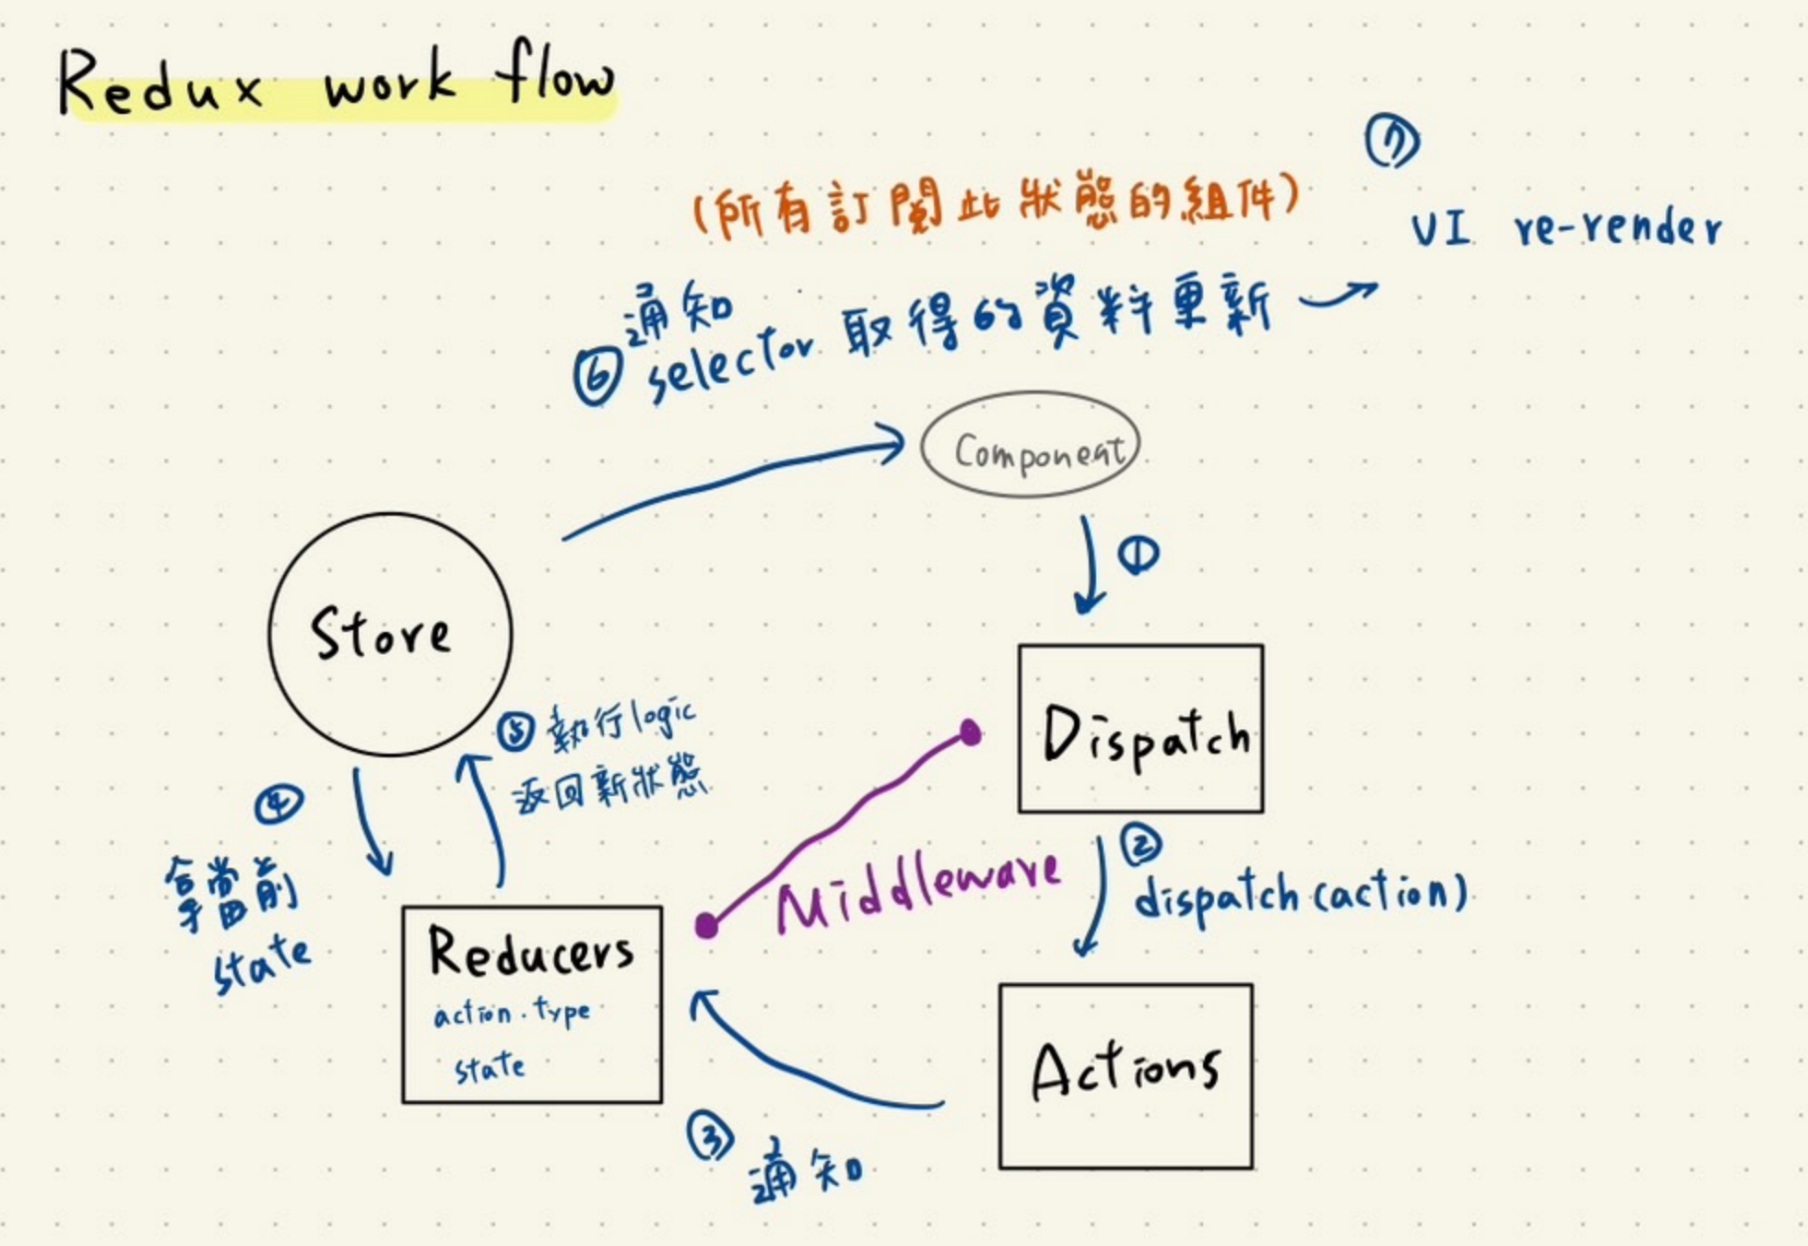 1-3. 組件用 dispatch 發送 action type 及 value 的通知給 reducer
4. reducer 跟 store 拿當前值後執行自身的邏輯(帶入 dispatch 的 value)
5. 返回執行後的新狀態給 store,讓 store 更新
6. store 通知所有訂閱該狀態的組件
7. 組件根據新狀態決定是否 re-render 或者其他處理
紫色的線 Middleware
介於 Reducer 跟 Dispatch 之間,攔截跟處理 action(非同步、logger 日誌、錯誤追蹤、權限檢驗等)
實際撰寫 - RTK (Redux Tool)
雖然有大致寫過 Redux 傳統寫法,但後來開發以 RTK 居多,因此這邊介紹的是 RTK 的 methods。( 只能說 RTK 寫起來真香! )
定義一個 store file
import { combineReducers } from 'redux';
import { configureStore, ThunkAction, Action } from '@reduxjs/toolkit';
import type { PreloadedState } from '@reduxjs/toolkit';

// combineReducers 將多個 reducer 合併成一個主 reducer,方便分類管理
const rootReducer = combineReducers({
  ...
});

// configureStore 創建存放狀態的 store
const store = configureStore({
  reducer: rootReducer,
});

// for unit test
export const setupStore = (preloadedState: PreloadedState<RootState>) =>
  configureStore({
    reducer: rootReducer,
    preloadedState,
  });

export default store;

export type AppDispatch = typeof store.dispatch;
export type AppStore = ReturnType<typeof setupStore>;
export type RootState = ReturnType<typeof store.getState>;
export type AppThunk<ReturnType = void> = ThunkAction<ReturnType, RootState, unknown, Action<string>>;
創建 reducer file
import { createSlice } from '@reduxjs/toolkit';

// 必須初始化狀態
const initialState = {
  time: '2024-01-01',
};

// slice 是一個把多個針對同項目的 reducer 整理成一個管理集合
const timeSlice = createSlice({
  name: 'time',
  initialState,
  reducers: {
    updateTime: (state, action) => {
      state.time = action.payload;
    },
    resetTime: (state, action) => {
      state.time = initialState.time;
    },
  },
});

export const { updateTime } = timeSlice.actions;

// reducer file 基本上會被放進 store.ts 並用 combineReducers 整合
// 可根據需求再分類的更細
export default timeSlice.reducer;
主入口 index file,使用 Provider 引入 store,子組件都可以 access 這個 store
import { Provider, useSelector, useDispatch } from 'react-redux';

import { updateTime } from 'store/reducers/timeReducer'; // 從 reducer 拿要用的 action type

// 觸發 reducer 必須由 dispatch 發送,像是點擊 Root button 的 callback
const dispatch = useDispatch();
const time = useSelector((state: RootState) => state.time); // 使用 useSelector 從 store 存取狀態


const Root = (): JSX.Element => (
  <QueryClientProvider client={queryClient}>
    <Provider store={store}>
          <div>
            <App />
            <button onClick={()=> dispatch(updateTime(...))}> Update time</button>
          </div>
    </Provider>
  </QueryClientProvider>
);
以上是最基本的 RTK 寫法,需要定義的東西比傳統 Redux 的方式來的精簡。